Sunday, September 17, 2023

Compare Python, NumPy and PyTorch Performance

Target audience: Beginner
Estimated reading time: 4'

Recently, I embarked on a healthcare project that involved extracting diagnostic information from Electronic Health Records. While fine-tuning a BERT model, I noticed some atypical latency behaviors. This prompted me to conduct a performance comparison between Python lists, NumPy arrays, and PyTorch tensors.
The implementation relies on a timer decorator to collect latency values.


Table of contents
Follow me on LinkedIn

Notes
  • The implementation uses Python 3.11
  • To enhance the readability of the algorithm implementations, we have omitted non-essential code elements like error checking, comments, exceptions, validation of class and method arguments, scoping qualifiers, and import statements.

Introduction

I assume that most readers are familiar with the various Python, NumPy and PyTorch containers used in this article. But just in case, here is a quick refresh:

Python list
A list in Python is similar to an array in C, C++, Java or Scala except that its elements can have different types.

Python arrays: Array is a container which can hold a fix number of items or elements. Contrary to lists, items of an array should be of the same type. Most of the data structures make use of arrays to implement their algorithms [ref 1].

NumPy arraysA numPy array represents a multidimensional, homogeneous array of fixed-size items. It is implemented as a static buffer of contiguous values of identical types which index can be dynamically modified to generate matrix, tensor or higher dimension numerical structures [ref 2
].

PyTorch tensors: Similarly to numpy array, PyTorch tensors are multi-dimensional arrays containing elements of a single data type. The tensors share the same semantic and operators as NumPy arrays but also support automatic differentiation and support GPU/Cuda math libraries [ref 3].

Timing with decorator

Decorators are very powerful tools in Python since it allows programmers to modify the behavior of a function, method or even a class. Decorators wrap another function in order to extend the behavior of the wrapped function, without permanently modifying it [ref 4].

def timeit(func):
    ''' Decorator for timing execution of methods'''

    def wrapper(*args, **kwargs):
        start = time.time()
        func(*args, **kwargs)
        duration = '{:.3f}'.format(time.time() - start)
        logging.info(f'{args[1]}:{args[3]}\t{duration} secs.')
        return 0

    return wrapper


Benchmark implementation

The objective is to automate the comparison of the various framework and functions by creating a wrapper EvalFunction class.
The evaluation class has two arguments:
  • Descriptive name of the function, func_name used to evaluate the data structures
  • The signature of the function , func used to evaluate the data structures
import array as ar
import time
import numpy as np
from random import Random
from typing import List, AnyStr, Callable, Any, NoReturn
import math
import torch
from dataclasses import dataclass
import logging
from matplotlib import pyplot as plt

collector = {}
@dataclass class EvalFunction: """ Data class for evaluation of Python lists, Array, Numpy array and torch tensor :param func_name Description of the function to execute :param func Lambda to be executed """ func_name: AnyStr func: Callable[[Any], float]  
   def compare(self, input_list: List[float], fraction: float = 0.0) -> NoReturn:
     input_max: int = \
math.floor(len(input_list)*fraction) if 0.0 < fraction <= 1.0 \
else len(input_list)

input_data = input_list[:input_max]

       # Execute lambda through Python list
       self.__execute('python', input_data, 'list:      ')

       # Execute lambda through Python array
       input_array = ar.array('d', input_data)
       self.__execute('python', input_array, 'array:      ')

       # Execute lambda through numpy array
       np_input = np.array(input_list, dtype=np.float32)
       self.__execute('python', np_input, 'lambda: ')

       # Execute native numpy methods
       self.__execute('numpy', np_input, 'native:   ')

       # Execute PyTorch method on CPU
       tensor = torch.tensor(np_input, dtype=torch.float32, device='cpu')
       self.__execute('pytorch', tensor, '(CPU):    ')

       # Execute PyTorch method on GPU
       tensor = torch.tensor(np_input, dtype=torch.float32, device='cuda:0')
       self.__execute('pytorch', tensor, '(CUDA)')


The implementation of the supporting, private method, __execute is described in the Appendix

Evaluation

We've chosen a collection of mathematical transformations that vary in complexity and computational demand to evaluate different frameworks. These transformations involve calculating the mean values produced by the subsequent functions:
\[x_{i}=1+rand{[0, 1]}\]
\[average(x)=\frac{1}{n}\sum_{1}^{n}x_{i}\]
\[sine(x) = average\left ( \sum_{1}^{n}sin\left ( x_{i} \right ) \right )\]
\[sin.exp(x) = average\left ( \sum_{1}^{n}sin\left ( x_{i} \right ) e^{-x_{i}^{2}} \right )\]
\[sin.exp.log(x) = average\left ( \sum_{1}^{n}sin\left ( x_{i} \right ) e^{-x_{i}^{2}} + log(1 + x_{i}))\right )\]

# Functions to evaluate data structures
def average(x) -> float:
    return sum(x)/len(x)
def sine(x) -> float:
    return sum([math.sin(t) for t in x])/len(x)
def sin_exp(x) -> float:
    return sum([math.sin(t)*math.exp(-t) for t in x])/len(x)


# Random value generator
rand = Random(42) num_values = 500_000_000 my_list: List[float] = [1.0 + rand.uniform(0.0, 0.1)] * num_values

# Fraction of the original data set of 500 million data points
fractions = [0.2, 0.4, 0.6, 0.8, 1.0]

# Evaluate the latency for sub data sets of size , len(my_list)*fraction
for fraction in fractions:
eval_average = EvalFunction('sin_exp', average)
eval_average.compare(my_list, fraction)

# x-axis values as size=  len(my_list)*fraction
data_sizes = [math.floor(num_values*fraction) for fraction in fractions]

# Invoke the plotting method
plotter = Plotter(data_sizes, collector)
plotter.plot('Sin*exp 500M')

We conducted the test on an AWS EC2 instance of type p3.2xlarge, equipped with 8 virtual cores, 64GB of memory, and an Nvidia V100 GPU. A basic method for plotting the results is provided in the appendix.

Study 1
We compared the computation time required to determine the {x} -> average{x}  of 500 million real numbers within a Python list, array, NumPy array, and PyTorch tensor.


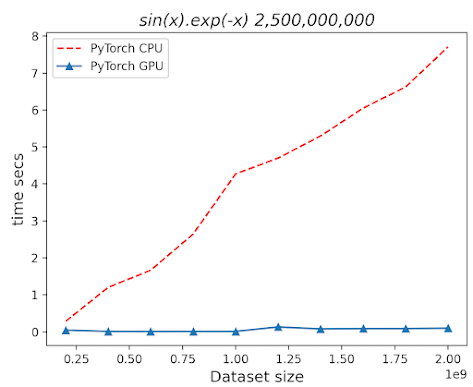
We compared the computation time required to apply the {x} -> sin{x}.exp{-x} function to 500 million real numbers within a Python list, array, NumPy array, and PyTorch tensor.


Conclusion
  • The performance difference between executing on the GPU versus the CPU becomes more pronounced as the dataset size grows.
  • Predictably, the runtime for both the 'average' and 'sin_exp' functions scales linearly with the size of the dataset when using Python lists or arrays.
  • When executed on the CPU, PyTorch tensors show a 20% performance improvement over NumPy arrays.

Study 2
Le't compare the relative performance of GPU and GPU during the processing of a large PyTorch tensor.


Conclusion
The size of dataset has a very limited impact on the performance of processing PyTorch tensor on GPU while the execution time increases linearly on CPU.

Thank you for reading this article. For more information ...

References


Appendix

The __execute method take two arguments used in the structural pattern match:
  • The framework used to identify the
  • The input data to be processed
The private method __numpy_func applies each the functions (average, sine,...) to a NumPy array, np_array generated from the original list.
The method, __pytorch_func applies each function to a torch tensor derived from np_array.


def __execute(self, framework: AnyStr, input: Any) -> float:
    match framework:
        case 'python':
           return self.func(input)
        case 'numpy':
           return self.__numpy_func(input)
        case 'pytorch':
           return self.__pytorch_func(input)
        case _
           return -1.0


def __numpy_func(self, np_array: np.array) -> float:
   match self.func_name:
      case 'average':
          return np.average(np_array).item()
      case 'sine':
          return np.average(np.sin(np_array)).item()
      case 'sin_exp':
          return np.average(np.sin(np_array)*np.exp(-np_array)).item()


def __pytorch_func(self, tensor: torch.tensor) -> float:
    match self.func_name:
       case 'average':
          return torch.mean(tensor).float()
       case 'sine':
          return torch.mean(torch.sin(tensor)).float()
       case 'sin_exp':
          return torch.mean(torch.sin(tensor) * torch.exp(-tensor)).float()


A simple class, Plotter, to wraps the creation and display of plots using matplotlib.

class Plotter(object):
    markers = ['r--', '^-', '+--', '--', '*-']

    def __init__(self, dataset_sizes: List[int], results_map):
        self.sizes = dataset_sizes
        self.results_map = results_map

    def plot(self, title: AnyStr) -> NoReturn:
        index = 0
        np_sizes = np.array(self.sizes)
        for key, values in self.results_map.items():
            np_values = np.array(values)
            plt.plot(np_sizes, np_values, Plotter.markers[index % len(Plotter.markers)])
            index += 1

        plt.title(title, fontsize=16, fontstyle='italic')
        plt.xlabel('Dataset size', fontsize=13, fontstyle='normal')
        plt.ylabel('time secs', fontsize=13, fontstyle='normal')
        plt.legend(['Python List', 'Python Array', 'Numpy native', 'PyTorch CPU', 'PyTorch GPU'])
        plt.show()


---------------------------
Patrick Nicolas has over 25 years of experience in software and data engineering, architecture design and end-to-end deployment and support with extensive knowledge in machine learning. 
He has been director of data engineering at Aideo Technologies since 2017 and he is the author of "Scala for Machine Learning" Packt Publishing ISBN 978-1-78712-238-3

Sunday, August 20, 2023

Automate Technical Documentation using LLM

Target audience: Beginner
Estimated reading time: 3'

It can be challenging for a data engineer or data scientist to produce, update and maintain the documentation for a project. This article presents the idea of "latent technical documentation" which utilizes tags on software development items (or artifacts), combined with a large language model (LLM), to develop, refine, and maintain a project's documentation.


Table of contents
Follow me on LinkedIn

Notes
  • The post describes the simple use of large language models. It is not an in-depth description or even an introduction to LLM. 
  • ChatGPT API is introduced in two of my previous posts: Secure ChatGPT API client in Scala and ChatGPT API Python client.
  • To enhance the readability of the algorithm implementations, we have omitted non-essential code elements like error checking, comments, exceptions, validation of class and method arguments, scoping qualifiers, and import statements.

Overview

Challenges

The key challenges for documenting an AI-based project to be deployed in production are
  • Information spread across multiple platforms and devices.
  • Uneven documentation from contributors, experts with different background; Data engineers, DevOps, Scientists, Product managers, ...
  • Sections of the documentation being out-of-date following recent change in product or service requirements.
  • Missing justification for design or modeling decision.

What is latent documentation?

Latent technical documentation is a two-step process:
  1. Tagger: Insert comments or document fragments related to a project for each artifact, item or step in the development process (coding, architecture design, unit testing, version control commits, deployment scripts, configurations containers definition and orchestration, ...).
  2. Generator: Gather and consolidate various doc fragments into a single pre-formatted document for the entire project. A large language model (LLM) is an adequate tool to generate a clear and concise documentation.
The following diagram illustrates the tagging-generation process.

Illustration of two step latent documentation


Tagging artifacts is accomplished by defining an easy to use format that does not add overhead in the development cycle.
In this post we use the following format to select and tag relevant information in an artifact:
    ^#tag_key comments^

Example^#KafkaPipelineStream Initiate the processing of streams given properties assigned to the Kafka streams, in config/kafka.conf^

The second step, generation of the project document consists of collecting, parsing tags across the various artifacts, then generate a summary or/and formal document for the project. 
Let's review some of the artifact tags.

Tagging artifacts

The engineers, data scientists tags,  key & comment, for as many as possible artifacts used in the development and in the case of AI, training, and validation of models. A partial list of artifacts:
  • Source code files
  • Deployment scripts
  • Version control comments and logs
  • Unit tests objectives
  • Test results
  • Orchestration libraries such Airflow
  • Container-based frameworks such as Docker, Kubernetes or TerraFlow
  • Product requirement documents (PRD, MRD)
  • Minutes of meetings.

Python code

Documentation can be extracted from Python source code by selecting and tagging section of the comments. This process does not add much overhead to the development cycle as the contentious developers document their code, anyway.

async def post(self) -> list:
    """
       ^#AsyncHTTP Process the list of iterator (1 iterator per client). 
       The steps are:
        1. Create a tasks from co-routine
        2. Aggregate the various tasks
        3. Block on the completion of all the tasks^
        :return: List of results
    """
    tasks = self.__create_tasks()      
    all_tasks = asyncio.gather(*tasks) 
    responses = await all_tasks       

    assert self.num_requests == len(responses), \
            f'Number of responses {len(responses)} != number of requests {self.num_requests}'
    
    return responses


In this code snippet, the documentation fragment "Process the list ....    of all the tasks" will be associated with the key AsyncHTTP.

Scala code

The following code snippet define a tag with key KafkaPipelineStream for the class constructor PipelineStreams and method start.

/**
 * ^#KafkaPipelineStream Parameterized basic pipeline streams that consumes requests.
    using Kafka stream.The topology is created from the request and response topic.
    This class inherits from PipelineStreams.^
 * @param valueDeserializerClass Class or type used in the deserialization for Kafka consumer
 * @tparam T Type of Kafka message consumed
 * @see org.streamingeval.kafka.streams.PipelineStreams
 */
private[kafka] abstract class PipelineStreams[T](valueDeserializerClass: String) {
  protected[this] val properties: Properties = getProperties
  protected[this] val streamBuilder: StreamsBuilder = new StreamsBuilder

  /**
   * ^#KafkaPipelineStream Initiate the processing of streams given properties assigned
      to the Kafka streams, in config/kafka.conf^
   * @param requestTopic Input topic for request (Prediction or Feedback)
   * @param responseTopic Output topic for response
   */
  def start(requestTopic: String, responseTopic: String): Unit =
    for {
      topology <- createTopology(requestTopic, responseTopic)
    } 
    yield {
      val streams = new KafkaStreams(topology, properties)
      streams.cleanUp()
      streams.start()

      logger.info(s"Streaming for $requestTopic requests started!")
      val delayMs = 2000L
      delay(delayMs)

      // Shut down the streaming
      sys.ShutdownHookThread {
          streams.close(Duration.ofSeconds(12))
      }
    }
}

GitHub commits

Documentation can be augmented by tagging the comment(s) to a version control  commit request. The following command line add comment for the key KafkaPipelineStream for a commit.

git commit -m "^#KafkaPipelineStreams Implementation of streams using RequestSerDe and R
esponseSerDe serialization-deserialization pairs^ for parameterized requests and responses" .

Airflow DAG & tasks

Here is an example of tagging section of comments on a Airflow Direct Acyclic Graph (DAG) of executable tasks, with the same key KafkaPipelineStream.

default_args = {
    'owner': 'herold',
    'retries': 3,
    'retry_delay': timedelta(minutes=10)
}


@dag(dag_id='produce_note_from_s3',
     default_args=default_args,
     start_date=datetime(2023, 4, 12),
     schedule_interval='@hourly')


"""
    ^#KafkaPipelineStream Definition of the DAG to load unstructured medical 
    documents from AWS S3. It relies on the loader function, 
    s3_loader defined in module kafka.util.^
"""
def collect_from_s3_etl():

    @task()
    def load_from_s3():
        return s3_loader()

    produced_notes = ProduceToTopicOperator(
        task_id="loaded_from_s3",
        kafka_config_id="kafka_default",
        topic=KAFKA_TOPIC,
        producer_function=loader_notes,
        producer_function_args=["{{ ti.xcom_pull(task_ids='load_from_s3')}}"],
        poll_timeout=10,
    )
    
    produced_notes()

Docker compose

Comments and tags can be also added to container application development such as Docker or a container orchestrator like Kubernetes. 
The following multi-container descriptor, docker-compose.yml uses KafkaPipelineStream tag to add information regarding application deployment configuration to the project documentation.

version: '0.1'
networks:
    datapipeline:
        driver: bridge

services:
    zookeeper:
        # .... image and environment

        # ^#KafkaPipelineStream Kafka docker image loaded from bantam following zookeeper deployment
        # Port 29092
        # Consumer properties
        # KAFKA_CONSUMER_CONFIGURATION_POOL_TIME_INTERVAL: 14800
        # KAFKA_CONSUMER_CONFIGURATION_MAX_POLL_RECORDS: 120
        # KAFKA_CONSUMER_CONFIGURATION_FETCH_MAX_BYTES: 5428800
        # KAFKA_CONSUMER_CONFIGURATION_MAX_PARTITION_FETCH_BYTES: 1048576^
    kafka:
        image: bitnami/kafka:latest
        container_name: "Kafka"
        restart: always
        depends_on:
            - zookeeper
        ports:
            - 29092:29092
        environment:
            KAFKA_BROKER_ID: 1
            KAFKA_ZOOKEEPER_CONNECT: zookeeper:2181
            KAFKA_ADVERTISED_LISTENERS: PLAINTEXT://kafka:9092, PLAINTEXT_HOST://localhost:29092
            KAFKA_LISTENER_SECURITY_PROTOCOL_MAP: PLAINTEXT:PLAINTEXT,PLAINTEXST_HOST:PLAINTEXT
            KAFKA_INTER_BROKER_LISTENER_NAME: PLAINTEXT
            KAFKA_OFFSETS_TOPIC_REPLICATION_FACTOR: 1
            KAFKA_CONSUMER_CONFIGURATION_POOL_TIME_INTERVAL: 14800
            KAFKA_CONSUMER_CONFIGURATION_MAX_POLL_RECORDS: 120
            KAFKA_CONSUMER_CONFIGURATION_FETCH_MAX_BYTES: 5428800
            KAFKA_CONSUMER_CONFIGURATION_MAX_PARTITION_FETCH_BYTES: 1048576
        volumes:
            - ./producer:/producer
            - ./consumer:/consumer
        networks:
            - datapipeline


Generating documentation

The next challenge is to collect and generate the documentation. The step for the generation of overall project documents consists of 
  1. Collecting artifact using a script
  2. Extracting tags as key value pairs
  3. Grouping the various documentation fragments per key
  4. Formatting, optionally and forwarding the document to a LLM model.

Large language models

Let's look at generative AI to create a formal, final project document. The process  aggregates the various tag comment  into a single text which is used as the context prompt ('system' role in ChatGPT).

The following document was produced by ChatGPT 4.0 [ref 1]  although alternative large language models could be also used.
Please refer to the implementation of client to ChatGPT in Scala Secure ChatGPT API client in Scala and in Python ChatGPT API Python client.

1. Overview of PipelineStreams Class:
- The class inherits from PipelineStreams.
- It sets up parameterized basic pipeline streams that consume requests using Kafka stream.
- The topology is derived from both the request and response topics.


2. Kafka Streams Configuration:
- The processing of streams is initiated based on properties assigned to the Kafka streams.
- These properties are located in config/kafka.conf.

3. Implementation Details:
- Streams are implemented using RequestSerDe and ResponseSerDe serialization-deserialization pairs.

4. Loading Medical Documents from AWS S3:
- A Directed Acyclic Graph (DAG) is defined to load unstructured medical documents.
- The loading relies on the s3_loader function.
- The s3_loader function is defined in the kafka.util module.

5. Kafka Docker Deployment:
- Kafka docker image is sourced from bitnami.
- It follows a zookeeper deployment.
- The default port is 29092.

6. Kafka Consumer Properties:
- KAFKA_CONSUMER_CONFIGURATION_POOL_TIME_INTERVAL: 14800
- KAFKA_CONSUMER_CONFIGURATION_MAX_POLL_RECORDS: 120
- KAFKA_CONSUMER_CONFIGURATION_FETCH_MAX_BYTES: 5428800
- KAFKA_CONSUMER_CONFIGURATION_MAX_PARTITION_FETCH_BYTES: 1048576


The LLM produces a document of quality based on the quality of the prompt you provide. So, you must craft the tags used as context in the LLM request meticulously.

The maximum token limit for an LLM prompt (ChatGPT 4.0: 8192, Llama-2: 4096, Llama-code: 16384) can constrain the quantity of tagged information used to create the project document.
Using Retrieval-Augmented Generation (RAG), you can bypass the token restriction by defining the various tag inputs as embedded vectors and storing them in a vector database.

Retrieval-Augmented Generation (RAG)

Retrieval augmented generation is a more sophisticated leverage of large language models (LLMs). This is a machine learning framework that relies on an external knowledge base to improve the accuracy of LLMs [ref 2]. The knowledge base contains up to date, domain specific information.

In our case, the knowledge base is built by defining questions (tags) and expected output documentation.

Thank you for reading this article. For more information ...

References


---------------------------
Patrick Nicolas has over 25 years of experience in software and data engineering, architecture design and end-to-end deployment and support with extensive knowledge in machine learning. 
He has been director of data engineering at Aideo Technologies since 2017 and he is the author of "Scala for Machine Learning" Packt Publishing ISBN 978-1-78712-238-3